Ad Machina Wargaming

20mm WWII Wargames

  • FIGURES
    • Conversions
    • Painting
  • VEHICLES
    • Model building
    • Conversions
    • Painting
  • Terrain
  • Tutorials
  • MORE
    • Rules
    • Movies
    • Books
    • Warhammer
    • Fun stuff
  • GALLERY
    • WWII Germany
    • WWII US
  • INFO
    • About Me
    • Blog rules
    • Blog info
  • Normandy project
  • La Fière Bridge project
  • Sicily project

Mini Tutorial: How to paint Fallschirmjägers with Army Painter Quickshade

Posted by Thomas Nielsen on December 13, 2013
Posted in: Figures, Normandy project, Painting (figures), Tutorials. Tagged: AB Figures, Army Painter Quickshade, Fallschirmjägers, Game Workshop Base Colour, Vallejo Acrylics. 5 Comments

This is a quick guide on how I paint my 20mm wwii figures using Army Painter Quickshade. I will demonstrate on some Fallschirmjägers that I am painting for my Normandy Project, but it could be almost anything other than this, the limitations comes when you want to add colors that are very bright because the Army Painter is brown and will make the figures look a bit dull and dirty (which is great for modern war themes).

FJ colors
1. Before painting I of course made some research on camo and colors, in this case I actually used quite some time trying to find the right uniforms for the era. In the end what I found out can be summed up in this picture from a Dragon 1:35 figure box. I used the color scheme from example 2 and 3, in the other zug’s I will probably also use the two other examples to make the overall look more rag tag style.

FJ 6
2. The figures are glued on to some coins using Super Glue Gel. Then I add a mixture of sand (from the beach) and fine gravel (from a road mending), this is glued to the bases using a thin acrylic glue.

FJ 6
3. With a big brush (size 10) I paint the base with a special base color from Games Workshop. Normally I’m not a big fan of GW’s paints, but I really like this base colors – they have lots of pigments and shrink when it dries which helps keeping the details on the small figures. This is an older version of the paint, GW have altered the colors and renamed them, but you will probably be able to find something similar.

FJ 6
4. I then drybrush the base with Vallejo color number 120.

FJ 6
5. Now it is time to give the figures their base color. This is the color the Fallschirmjägers camo jackets and helmet covers will have. I use GW’s Base Color: Rakarth Flesh. Until now I have been using the same big brush for all steps.

FJ 6
6. I will now paint all the details on the figures. It is necessary to pick colors slighty brighter than intended because the Army Painter varnish will darken them a bit. I try to add the colors in the best order possible because on this small sized figures I can’t paint perfect, by picking the right order, hopefully my accidents will happen on a detail that haven’t been painted yet. But still I will always have to make some small corrections before moving on to next step. I use brush size 1 for all this colors.

The colors I use are:

  • Vallejo Medium Sea Grey 158 for haversack bags.
  • Black for metal parts.
  • Vallejo Grey Green 165 for the dark canvas ammo belt.
  • Vallejo German Cam Orange Ochre 128 for brown details such as the wood on the rifles and canteens (the one on seen in the picture i found out was too dark to use).
  • Vallejo Leather Brown 147 I use for all leather details.
  • Vallejo Yellow Green 112 for trousers and the helmets that don’t have helmet covers.
  • Vallejo Basic Skincolor 017 for skin.
  • Vallejo Amarillo Caqui 120 for the panzerfaust.

FJ 6
7. Almost all colors are added, flat and with no shadows or highlights. The Metal paint and the colors in the camo will be painted on after the Army Painter has been added.

FJ 6
8. I use the “Strong Tone” version of the Army Painter. The can that comes with the varnish isn’t very good, if the lid isn’t perfect sealed it will dry out. I therefore have some of it in a glass jar which is easier to keep sealed, while the can is put into a freezer bag and tucked away.

FJ 6
9. Using the big brush again I add the varnish to the figures, including the bases. It is necessary to move it around a bit with the brush to make sure that it looks okay. It is important not to use too much of the varnish, it is quite thick and if it lies on top of folds and other highlighted areas it will look wrong, but it will by it self seek down in folds and holes, it just need a little help some places. Now it just have to dry. This can take several hours, I use to add the varnish before I go to bed and the day after I will be able to paint the rest.

FJ 6
10. The figures have been left to dry overnight. Now it is time for camo. I prefer doing this after the varnish is added, else the camo colors tend to mix too much with each other and doesn’t look as good. I start with the bare helmets that don’t have covers. The Fallschirmjägers did spraypaint their helmets with dunkelgelb (dark yellow) color – I am not going to spraypaint color on such small figures so I’ll use the brush. The acrylics don’t have to be a GW base color, it was what I had. I make the color thinner with water and add it in steps, letting it dry before adding more, I work my way inwards to give the color a gradient look.

FJ 6
11. Before I paint rest of the camo I will give the figures a Dull Coat, I think that Model Masters is by far the best one (my bottle has almost dried out though, which make it hard to work with and I don’t think it is as matt as it used to be, have to buy a new one).

FJ 6
12. The camo is added with a thin brush, using Leather Brown 147 and Reflective Green 090. The splinter pattern camo is by far the hardest one to get to look right if asking me. I have to upscale it a bit, otherwise it will be too hard to recognize, and hard to paint too with all those small details. I have seen some adding the thin strokes that is typical for the camo, but this is way to overkill for me, even the thinnest strokes your are able to paint with your brush will be far to big – it just looks all wrong. After this I add Metal color to the weapons, paint the bigger stones on the base greyish. Then the last thing to do is to give it all a thin layer of dull coat again.

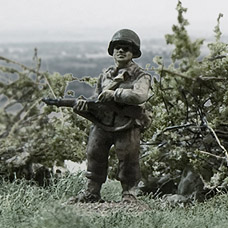
Here are the finished figures:
FJ 6
FJ 6
FJ 6
FJ 6
FJ 6
FJ 6
FJ 6

Now I will hurry up and paint the rest of the platoon (about 30 figs) :-)

Similar tutorials: Painting US ETO soldiers

Rate this:

Fallschirmjägers spotted! (WIP)

Posted by Thomas Nielsen on December 10, 2013
Posted in: Normandy project, Painting (figures). Tagged: AB Figures, Fallschirmjäger. Leave a comment

FJ 6

Soon finished with my latest task of painting a US platoon to be used in my Normandie games, I will go on and make some Fallschirmjägers from FJR 6 for the same campaign. I will start out with a squad to try find the right colors, then a whole platoon or hopefully two will follow.

The US soldiers in the top are amongst the last one’s that has to be painted for fullfilling the US platoon.

Rate this:

US Infantry progress…

Posted by Thomas Nielsen on December 7, 2013
Posted in: Figures, Normandy project, Painting (figures). Tagged: AB Figures, Battlegroup Overlord, Normandy, US soldiers. Leave a comment


Click for bigger picture…

Since I started up again a week ago I have been productive, or as productive I can be…
Just finished this two Squads (+ a medic), the left squad is the Command squad. Quite soon the last squad will be finished and when I have painted their support weapons (2 Machine Gun teams and a Light Mortar team) I have 2 US platoons and one to go before the Company is ready. I organize my troops so that they fit the Armoured Divisions armylist from Battlegroup: Overlord.

I didn’t feel that my newly bought Armypainter Quickshade was as good as the old one, but after using it a couple of times it feels right again. One thing I don’t like with it though, is that it is much more glossy than the old one. I always gives my figures a dull coat, but still it is quite irritating, thinking that it will be visible when the coat starts to be worn down.


What I have to paint before the company is done (a few figures need to be bought though).


Already painted: The first platoon… Not very much considering that I have been doing this for some years… But at some point last year I washed all the painted stuff down, both US and Germans, and started to repaint all my figures.

Rate this:

US 60mm Mortar Team

Posted by Thomas Nielsen on December 3, 2013
Posted in: Figures, Normandy project, Painting (figures). Tagged: 60mm mortar, Army Painter Quickshade, Evergreen. 3 Comments


Nothing special with this figs… what is special is that this four figures (I made a soldier with a BAR too) are the first one’s that I have painted in more than a year.

On the mortar base I added some grenade tubes to make the base a bit more intresting – made them out of some Evergreen Styrene Rod. My old Army Painter Quickshade had finally dried in, so I had to jump on my bike and head for the Hobby store. The new varnsish was not as dark as the old one, I had to fiddle with it for a while before I was happy.


And of course, I had to put them into action. Click the picture to see it bigger for more details.
For those of you that read my Photo tutorial will maybe think why the Jeep and the Greyhound is out of focus – well because I wanted them to be :-)

Rate this:

Tutorial: Taking beautiful pictures of your models

Posted by Thomas Nielsen on November 26, 2013
Posted in: Tutorials. Tagged: Jagd Tiger, Kfz. 61, Panzer III, Photos. 5 Comments

I have to start with saying that this is mainly for people using SLR cameras. I hope there is something that those of you using pocket cameras and mobile phones will find useful too though.
By reading a book about photography or asking a pro you would probably learn something completely different than what I am writing here, I am just telling what works for me!

1. USEFUL GEAR

Lamps
The professional photographer would take this kind of pictures in a studio using expensive flash units. We modellers are spending our money on miniatures, models and acrylic colors so we have to use what we have in our home. This we can do in two ways: using the daylight that are streaming through our windows or by using whatever kind of electrical light sources that we have. Using the daylight can make beautiful pictures, but relying on the sun for taking pictures isn’t the best so I won’t cover that in this tutorial.

I do use all kind of lights that we have in our house to take my pictures, sometimes I use the halogen spots above our kitchen work bench, other times I just use the architect lamp on my work desk or the pendant lamp above our dining table – they all work great as long as the shutter on the camera are open long enough. When the shutter is open for more than a split second the picture will be shaken if you hold the camera in your hand. That is why I use a tripod.

Tripod
Tripods can be bought quite cheap and if you are not using it several times everyday I think it is overkill to buy an expensive one. If you don’t have the money or can’t wait to get along with your pictures and starts tonight already then it is also possible to fix the camera with other stuff such as books and boxes or whatever you find that can be useful, but I recommend using a tripod as this makes the session so much easier.

Remote trigger
Even if using a tripod, then the time the camera needs to take good pictures is quite long, and just by pressing the trigger can be enough to make the picture shaken. There is two way to fix this: the cheapest is to just use the timer in the camera, but to most cameras it is possible to buy a little neat remote trigger, they will probably not cost you that much but gives you the possibility to direct your architect lamp by hand if needed, or holding backgrounds behind the models – things that would be problematic standing behind the camera.

2. LIGHTING THE MODEL

There is typical three kind of situations when I want to take pictures of my models:

  • Making “studio” pictures on white background for presentations
  • Dioramas to give the impression of the model being a real full size vehicle (or miniature) in its enviroment
  • Taking pictures for Battle reports.

Studio pictures
This we do to let the audience see the model and all its details without distraction, preferable on a white background. Usually I let the model stand on a piece of pvc sheet, this gives a blurry reflection of the model that looks quite nice. A piece of paper will work great too, but will not reflect the model.

As background I use a piece of card board or whatever I have that is white. The lighting of the model doesn’t have to follow the rules of the real world with the sun as the only light source. You can place the lamp where ever you want to lid the model, typically you get the best result by put the light source in front of the model to one of the sides, a bit above the model. If you think that one of the sides don’t get light enough you can either use a light source more, or just put up a piece of white paper on the other side of the model and let the light reflect into the paper and down on the model – by looking through the view finder or the monitor (if your camera has one), you will be able to move the paper around to find the best spot for it.


A very simple studio. All picture in this article has been shot with this setup – using only the architect lamp on my work desk as light source.


A piece of paper is enough to lighten the dark side of the truck.

Dioramas
If you want to make pictures of your model that looks like it is in terrain then you get the best effect by trying to light the model as if the sun is the light source. It is important to only use one light source, or at least let one of the lamps be very dominant. If the intention is to mix your picture with a real life image of some environment, then it is important that you use the same strength and direction of the light source as in the image you will mix with, else it will look weird. If the sun is clear in the sky the shadows will be sharp and dark, if it is cloudy the shadows will be blurry and quite light. Don’t be afraid to use strong light that make the highlights very bright and the sides turning away from the light source very dark – this gives a nice effect!

Battle reports
Well, here it is important to make the picture very clear so that it is easy to understand what is happening on the terrain board. If you feel that the camera flash does give you the best result then this is okay, but if you want more realistic lighting I would make sure that the entire board is lighten up with one light direction more dominant than the others.

3. CAMERA SETTINGS

There are some settings you will have to do on your camera to be able to get good quality shots. Every camera has its own menu display and if you can’t find where to change the settings by your self then you have to look it up in the manual.

Flash
Turn it off.

Iso
Iso adds grain to the picture and the higher the number the more grains do you get. A very strong light allows you to take a picture without grain, but if the light is bad and the pictures getting dark then you can add grain and make the pictures lighter. A grainy picture can be very cool and used by many to get a special effect. Experiment to find the right amount for your own pictures. All pictures in this article is taken with Iso 100, the lowest possible setting.


A very high iso has destroyed this image.

White balance
Pictures taken inside is often very yellowish. To make sure this isn’t happening you have to fiddle with the white balance of the camera. There are probably pre-installed options called something like: Incandescent, Fluorescent, Direct sunlight, Flash, Cloudy, Shade.


If you don’t set the white balance right your image will probably look like the first one.

I prefer to set the white balance my self. You will need to find how to do this in your manual. The process will be to take a “test shot” on a piece of grey or white paper that you are holding in front of the lens, and then let the camera do the measurement. If you are going to do retouch in the computer you can easily fix the yellow light later.

Aperture priority
On the top of the camera, left side, there’s the wheel where you set your exposure mode, on most cameras those are: Auto, Manually, Aperture priority and Shutter priority – we go with the Aperture priority (marked with an A on a Nikon and Av on a Canon). This means that we set the aperture and the camera find the shutter speed for us. The reason to why we want to be able to set the aperture, instead of letting the camera do this for us, is to be able to choose what to be in focus. In Auto mode there will probably be areas on the model that is not in focus, in front and or in the back. But we want the whole model to be in focus and therefore set a higher aperture value. I often use an aperture of f18, you don’t want to go too high cause then the result will be that the overall picture is getting a bit blurry. The higher the aperture is, the longer the shutter time has to be – we use a very high aperture setting and that is why our camera has to be fixed or else the picture will be shaken.

If some part of the model still gets blurry after you have set the aperture, there is only one thing to do, move the camera backwards and zoom in.

If your pictures are to dark when using the Aperture priority (I have this problem with my old Nikon D80), it is quite easy to take a picture, notice what the shutter speed is and then change the exposure mode to Manually settings, keep the aperture as it is and just decrease the shutter speed until you are happy with the result. When only using the light from one architect lamp my shutter speed usually are 1.6 or 2 seconds.


First picture taken with exposure mode Auto. Both the gun and the rear of the model is blurry. Compared to picture two, that is shot with exposure mode Aperture priority (f22), the first picture present itself very bad. But a very high aperture comes at a price, the overall sharpness goes down a bit.

Image quality
Cameras saves your picture as either JPEG (same as JPG) or RAW. JPEG pictures will be smaller and in lower quality than RAW. I alway use RAW as it gives me the possibility to, later on in my computer, zoom in on certain details.

4. TAKE THE SHOT
If you have done all the above then the only thing left is to shot the picture… or is it? The cameras position in relation to the model will make a difference on the end result, see picture below:


The models in the two pictures above are placed exactly the same place, notice how the second tank looks much bigger in picture two – the only difference is that in the first image the camera is close to the models (wide-angle) and in the second image (telephoto) the camera has been pulled backward (and zoomed in). The knowledge on how to position the camera can be quite useful. It is possible to make more drama in a picture with a high wide-angle.

But if you have the camera too close to the model then you will not be able to get the model in focus – move the camera further back and if you want the model to fill the picture then zoom in.

I hope that some of this can help you to make better pictures of your models. If I forgot something or some of it is badly explained then feel free to write a comment.
Maybe I later on will write a photoshop tutorial to go with this one.

Rate this:

Inspiration is coming back…

Posted by Thomas Nielsen on November 23, 2013
Posted in: Conversions (vehicles), Info. Tagged: Dodge WC54. 3 Comments

It have been ages since I was active. The winter is coming (heard that quote before?) and the long rides on my bikes have been moved indoors and can be over with in an hour. All this newly won hours will hopefully be used behind the desk, painting and building stuff – and hey… we got new windows in our apartment and therefore I had to clean up in front of them, including my working desk – now it is shinning, a nice way to start up again.

First thing I will have to work on is my US infantry. I also have a project that I started before my absent, a Dodge Ambulance conversion to a WC54:

For some reason I really love those small Dodge trucks, I have several of them built already, just have to paint them.

EDIT: I forgot to mention that I also work on a tutorial on how to take good looking pictures of your models. I just have to make all the images that goes with the tutorial.

Rate this:

Sorry for not posting…

Posted by Thomas Nielsen on April 3, 2013
Posted in: Info. 2 Comments

I have had one of my long black out’s again. Typical I have this in the summer time when my focus is on being outside riding my bike and winter time is when I have the long evenings where I use hours behind my desk painting and building. But this winter has been so damn cold that my hobby room was impossible to warm up – in the mean time the the room has become more and more messy… I have to fix it before I start up again, the inspiration is there for sure.

Rate this:

House making – Part 6 (Next house)

Posted by Thomas Nielsen on December 11, 2012
Posted in: La Fière Bridge project, Normandy project, Terrain. Tagged: Casting, La Fière Bridge, Resin, Silicone moulds. 2 Comments

On to the next house. The doors are missing in the pictures but has been made, so hopefully the moulds can be made tomorrow!


Rate this:

House making – Part 5 (Adding roof)

Posted by Thomas Nielsen on December 9, 2012
Posted in: La Fière Bridge project, Normandy project, Terrain. Tagged: Casting, La Fière Bridge, Resin, Silicone moulds. 4 Comments

I have now made a mould of the roof piece. When making the roof mould I by accident placed the master on a uneven surface which gives me problems when making the cast, the resin tends to gather in one of the corners. The roof piece that comes out of that is harder to fit together with the house. It is easy to place the mould so it is plain when casting, but still it is quite irretating.

The following pictures are showing the house with added details, ready to get painted.


…and here after the primer:

Rate this:

House making – Part 4 (Assembling)

Posted by Thomas Nielsen on December 6, 2012
Posted in: La Fière Bridge project, Normandy project, Terrain. Tagged: Casting, La Fière Bridge, Resin, Silicone moulds. 3 Comments

I made a resin cast of all wall pieces today so that I could assemble my first house (still miss the roof). I made it harder to assemble by pouring too much resin in some of the moulds, this forced me to carve and sand to make it fit. The wall pieces had some air bobbles which my test casts didn’t have… I guess they came as the resin sets really fast, I have only 2 minutes before it harden and this make me pour the resin too fast.

I will soon make a mould on the roof piece but still need to fix some details first.


And this is the two-store barn in 1/1:

Rate this:

Posts navigation

← Older Entries
Newer Entries →
  • Second World War Wargaming

    This blog is mostly about making terrain, build and paint tanks and figures for scenarios fought in Western Europe 1944-1945, with a special focus on the Normandy campaign and the following months of fighting. The scale is 1/72 (20mm).
  • Join 63 other subscribers
  • Dealer links:

    • AB Figures (The best WWII 20mm miniature range)
    • Archers Fine Transfers (WWII Decals)
    • Fighting 15s (Selling AB Figures in Europe)
    • Jadar Hobby (Polish Online Shop)
    • Milicast (20mm vehicles and figures)
    • MMS (20mm figures and vehicles)
    • Model Hobbies (British Online Shop)
    • Plastic Soldier Company (Online shop with their own range of quick-build models. Publisher of the Battlegroup rulebooks.)
    • SHQ (20mm figures and vehicles)
    • Tracks & Troops (Czechian Online Hobby Shop with lots of cool specialities)
  • Nice-to-have links:

    • ArkieGamer (Wargaming blog)
    • Battlegroup Rules (Official site)
    • House of Queeg (Modelling Blog)
    • Luis at war (Wargaming blog)
    • Mig Jimenez (Modelling blog)
    • Miniature Zone (Wargaming blog)
    • Move to Contact (‘Battlegroup Kursk’ author’s blog)
    • The Guild (Wargaming forum)
    • Troop of Shewe (Painting blog)
    • Wargaming with Silver Whistle (Wargaming blog)
    • World War 20mm (Wargamer blog)
  • Archive

    • May 2017 (3)
    • April 2017 (2)
    • July 2015 (1)
    • June 2015 (1)
    • May 2015 (1)
    • July 2014 (1)
    • June 2014 (1)
    • April 2014 (1)
    • March 2014 (1)
    • February 2014 (6)
    • January 2014 (6)
    • December 2013 (10)
    • November 2013 (2)
    • April 2013 (1)
    • December 2012 (6)
    • November 2012 (2)
    • October 2012 (1)
    • September 2012 (1)
    • August 2012 (5)
    • July 2012 (5)
    • June 2012 (7)
    • May 2012 (1)
    • April 2012 (3)
    • December 2010 (1)
    • November 2010 (6)
    • May 2010 (1)
    • March 2010 (3)
    • February 2010 (11)
  • © Thomas Nielsen and Ad Machina Wargaming, 2010. Unauthorized use and/or duplication of this material without express and written permission from this blog’s author and owner is strictly prohibited. Excerpts and links may be used, provided that full and clear credit is given to Thomas Nielsen and Ad Machina Wargaming with appropriate and specific direction to the original content.
  • Log in (Private)

    • Create account
    • Log in
    • Entries feed
    • Comments feed
    • WordPress.com
Blog at WordPress.com.
Privacy & Cookies: This site uses cookies. By continuing to use this website, you agree to their use.
To find out more, including how to control cookies, see here: Cookie Policy
  • Subscribe Subscribed
    • Ad Machina Wargaming
    • Join 63 other subscribers
    • Already have a WordPress.com account? Log in now.
    • Ad Machina Wargaming
    • Subscribe Subscribed
    • Sign up
    • Log in
    • Report this content
    • View site in Reader
    • Manage subscriptions
    • Collapse this bar
 

Loading Comments...
 

    Design a site like this with WordPress.com
    Get started